
Natural light is like that super cool friend who can change the vibe just by being in the room. Getting a grip on its basics is key to snapping those jaw-dropping outdoor photos.
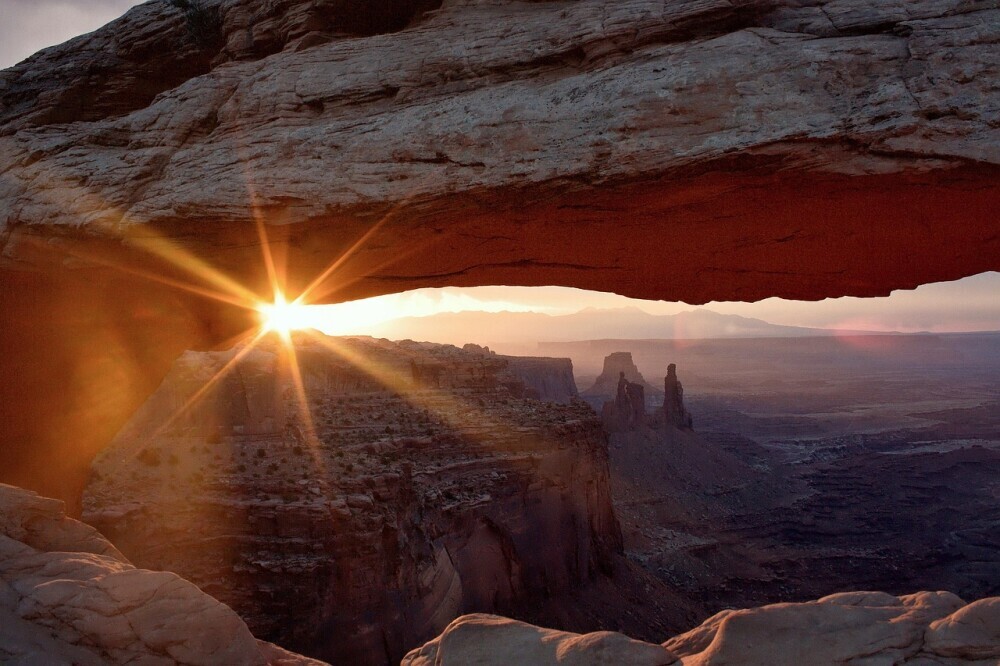
There are different types of natural light, and each has a unique character. We’ve got the golden hour, which is that magical time around sunrise or sunset, casting a warm, soft glow that makes everyone and everything look amazing. Then there’s the blue hour, right before the sun peeks out or after it hides, giving off this cool, calming vibe.
Midday light, on the other hand, beams down with full intensity, often creating harsh shadows. While it’s not always everyone’s favorite, learning how to play with it can lead to some epic shots too.
Light plays a big role in setting the mood and texture of your photo. Think about it: a soft morning light can add a dreamy quality, while the stark midday sun might throw in strong shadows and highlights.
Understanding some basic science behind natural light can give you the upper hand. We’re talking about intensity, color temperature, and direction. Knowing how bright the light is, what its hue is like, and the direction it’s coming from helps you in deciding when and where to aim your camera for the best effect.
Grasping these elements can take your photography from just alright to awe-inspiring, turning simple scenes into standout captures.
Planning Your Outdoor Photography Session
Outdoor photography is all about timing. Picking the right time can be the difference between a pretty good shot and one that blows people’s minds.
Checking the weather forecast before heading out is a solid move. Cloud cover can diffuse light beautifully, making for softer shadows and vibrant colors. Clouds don’t have to rain on your parade – they can actually be your allies.
Each time of day brings something unique to the table. Mornings might offer a serene calmness, while afternoons bathe the landscape in bold light and evenings wrap everything up in gentle hues. Planning your shoot around these can help nail the mood you’re going for.

There are some pretty handy apps and tools out there to scout and track light conditions. From checking sunrise and sunset times to plotting the sun’s path over the day, these can be game-changers when trying to capture specific light situations. Embrace the nerd side and use tech to your advantage.
When you plan around light conditions, you’re setting yourself up for success. Whether you want the soft whispers of dawn light or the striking statements of midday, knowing when and where to shoot is your secret weapon.
Mastering the Art of Exposure in Natural Light
Exposure can make or break your shot, so getting it right is a must. It’s all about finding that sweet spot with ISO, aperture, and shutter speed settings.
Balancing these settings can be tricky. Aperture controls how much light hits the sensor; a lower f-stop means more light and a shallower depth of field, creating that dreamy background blur. ISO adjusts your camera’s sensitivity to light. Start low in bright conditions, bump it up in darker settings, but watch for noise.
Shutter speed is how long the sensor is exposed to light. Fast speeds freeze action, while slower speeds can give motion a mystical blur. Keep an eye on it, especially when dealing with natural light, which can change in a heartbeat.

Histogram is your buddy here. Think of it as a quick visual check on your exposure levels. If the graph’s too far to the left, it’s underexposed – everything’s too dark. Too far right, and you’re looking at overexposure, where highlights are blown out.
It’s not just about avoiding mistakes, though; it’s about using these settings to bring your creative vision to life. Maybe you want a silhouette, or you’re after that sharp, detailed look with deep colors. Knowing how to juggle exposure settings helps you transform what you see into stunning images everyone will love.
Creative Techniques for Utilizing Natural Light
Natural light offers endless possibilities for creativity. Embracing its nuances can lead to some pretty killer shots.
Shadows are your ally in creating drama and depth. Use them to add a touch of mystery or to lead the viewer’s eye around the photo. Positioning yourself or your subject differently can alter these shadows, giving you more control over the final look.
Backlighting is another cool trick. When the sun is behind your subject, it creates stunning silhouettes or that beautiful halo effect. It’s all about positioning just right to capture the light spill perfectly without losing details.
Lens flare isn’t something to shy away from. When controlled, it can lend a gorgeous wash of light across the image, adding a pop of charm or softness. Experiment by angling your lens towards the sun just enough to catch that flare without it becoming overpowering.

Reflections also offer a great way to play with light. Whether it’s water, glass, or any reflective surface, these can double your scene’s impact, adding layers and visual interest.
Every shot is an opportunity to experiment. Natural light is dynamic, and harnessing its power means thinking outside the box and sometimes breaking the rules for that unforgettable shot.
Equipment and Accessories for Best Results
Having the right gear can totally level up your natural light photography game. It’s not about having the most expensive kit, but more about knowing what works for you.
A sturdy tripod is your go-to for keeping those shots steady, especially in weaker light during dusk or dawn. It saves you the stress of juggling with shaky hands and helps in playing with different exposures.

Reflectors are like your own personal sun. They help bounce light exactly where you need it, softening shadows and highlighting the subject without making things too intense. You can grab ones in silver, white, gold, or even make a DIY version with some foil and a cardboard piece.
Diffusers – these act as your best light softeners, particularly useful when the sun’s being overly harsh. Slap one between the sun and your subject to get that smooth, even lighting.
Choosing the right lens impacts how you capture light. A fast prime lens, like a 50mm with a wide aperture, can create stunning depth and beautiful bokeh, but also think about what works best for your style and subject.
Remember, it’s all about making the most out of what you’ve got. These tools can help you control natural light, turning challenging conditions into boundless creative opportunities.
Post-Processing Tips for Enhancing Natural Light Photography
Once you’ve bagged those stunning shots, it’s time to kick things up a notch with some post-processing magic. Editing can bring out the best in your natural light photos, keeping them true to life yet elevated.
If exposure’s been a bit tricky, editing software like Lightroom or Photoshop is your trusted sidekick. These tools let you correct exposure, tweak highlights, and recover shadows with finesse.
Color correction is a brilliant way to enhance the natural hues. You get to play with vibrancy, saturation, and contrast till you strike that perfect balance, making sure the image radiates with the liveliness of nature.

Adding HDR (High Dynamic Range) techniques can be a game changer, especially for photos shot in challenging light. It helps in bringing out intricate details and adds depth to your landscape or portrait shots.
Lastly, even when editing, remember to keep it authentic. Natural light photos have a unique charm because of their genuine feel. Subtle adjustments often go a long way in accentuating beauty without overdoing it.
Embrace editing as a part of your creative process. It’s all about refining and enhancing what you’ve captured, allowing your vision to shine through every image.


Dear there, Randi,
I absolutely loved this! As someone who’s been into outdoor photography for a while, I feel like this article really helped me understand light in a whole new way. I’ve always heard about the “golden hour” and “blue hour,” but the breakdown of how each type of natural light impacts the vibe of a shot was super insightful. I didn’t realize how much influence midday light can have if you approach it creatively.
Also, the section on exposure was gold. I’m still getting the hang of balancing ISO, aperture, and shutter speed, so the tips on using the histogram and adjusting settings for different moods was really helpful. And I never thought of using a reflector as my “personal sun,” but I’m definitely going to try it next time!
I’m definitely going to play around with some of these creative techniques, especially backlighting and lens flare. Can’t wait to see how my outdoor shots improve after applying some of these tips. Thanks for sharing this!
John
Hey John!
I’m so glad you found the article helpful! Outdoor photography is such a fun challenge, and mastering natural light really takes things to the next level. The golden and blue hours get all the hype, but midday light definitely has its own creative potential. I’m glad you’re seeing it in a new way!
Balancing ISO, aperture, and shutter speed can feel overwhelming at first, but once it clicks, it’s a game-changer. Using the histogram is such an underrated trick, and I love that the reflector-as-a-“personal sun” tip caught your attention! It’s a simple hack that makes a huge difference.
Excited to hear that you’ll be experimenting with backlighting and lens flare, those can add so much mood and depth to a shot. Hope you get some incredible results! Let me know how it goes.